For more background, please see our blog post introducing the HSIP Helper.
The HSIP helper contains all of the countermeasures that are categorized in the California Local Roadway User's Manual as having medium, high, or very high opportunity for a systemic approach. Each of these countermeasures are also categorized as being valid for collisions occuring at signalized intersections, non-signalized intersections, or on the roadway.
It is important to follow the steps in the Local Roadway User's Manual to better understand your data and the roadway characteristics in your area. You should be selecting data based on your engineering analyses and an understanding of your crash history.
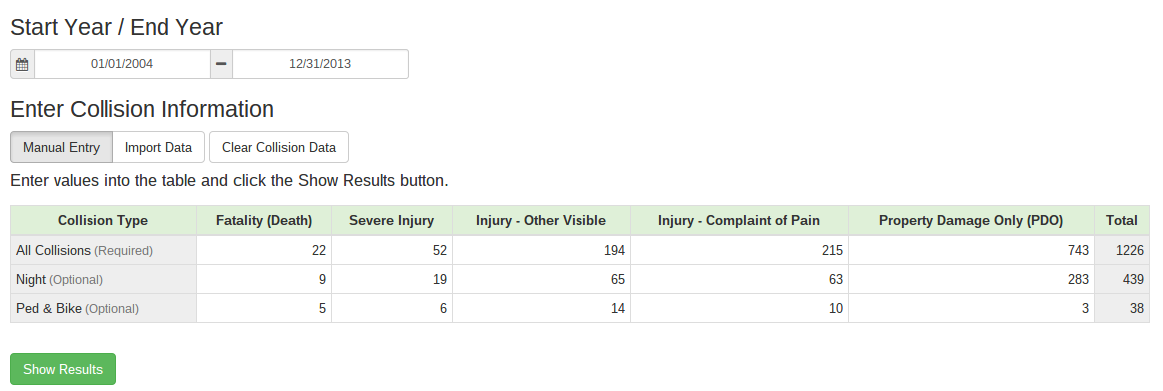
To begin using HSIP Helper, you should have your collision data ready and categorized by signalized intersections, non-signalized intersections or roadway. You must first decide the beginning and end years for your data. You are restricted to a maximum of 10 years, like for the actual HSIP application.
After selecting the time frame, you can then decide to either manually enter your collision counts by type and severity or by importing a file. If you manually enter the data, you should first enter the counts for the first row, All Collisions. Next you can specify how many of those collisions occurred at night or involved a pedestrian/bicyclist in the bottom two rows. Note the the counts for the night or ped/bike rows and columns should always be equal to or less than the first 'All Collisions' row. For example, in the following screenshot there were 22 fatalities in all collisions. 9 of those collisions occurred at night and 5 involved a ped/bike.
Ideally you have some type of collision data file that you can use instead of manually entering the collision counts. Click the Import Data button and you will see a list of the file formats that are acceptable. The formats include:
a .csv file downloaded from TIMS
a .txt file from the CHP I-SWITRS
Crossroads software files:
zipped shapefile
.txt
.csv
Google KML file
If you have any of those file types, click the Choose File button and navigate to the file. After selecting the file, the table will automatically populate. If for any reason you needed to correct the values in the table, you can do that by simply clicking on the appropriate cell.
Once you have a completed table, click the Show Results button to list the countermeasure results. In the recommended systemic countermeasures section the results will be shown:
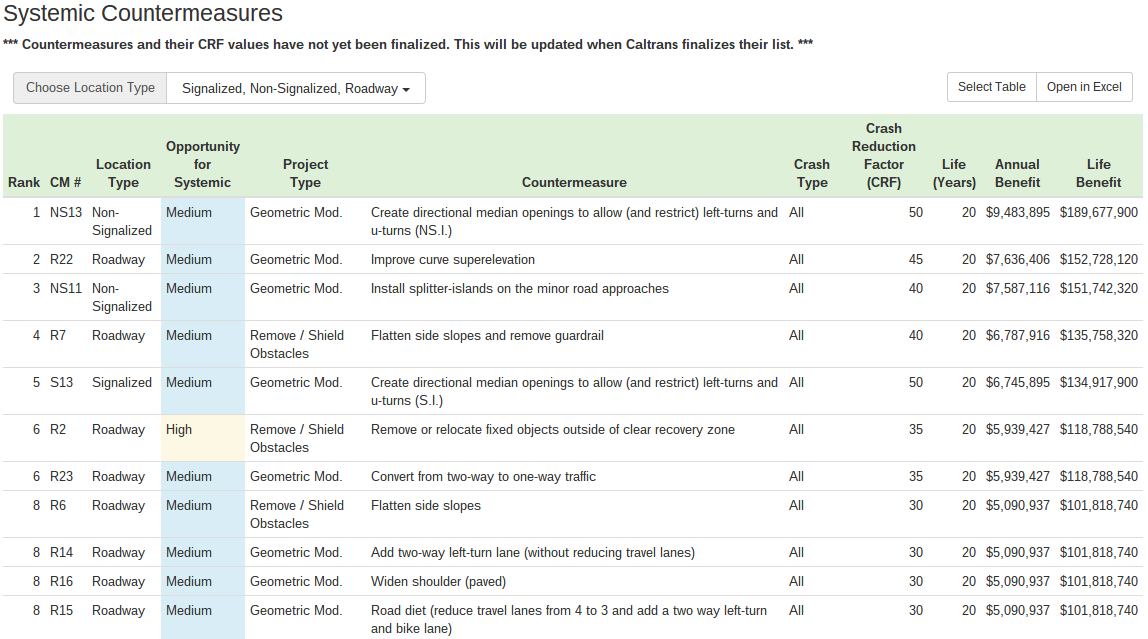
By default, all countermeasure location types (Signalized, Non-Signalized, and Roadway) are shown. You should select the applicable type to refresh the results table.
The results are ordered by the total benefit rank. The column "Opportunity for Systemic" is also color coded by the different medium, high or very high opportunity levels. At the top right above the table, there are two buttons to either Select the table (and then simply CTRL+C or right-click copy to paste into another document) or Open in Excel. The latter will directly open the table if you have Microsoft Excel on your computer.
The results from the HSIP Helper tool only summarize potential benefits. If you have approximate costs in mind, however, you can easily do some rough calculations for ballpark estimates. You will need to complete the official Caltrans application forms when ready to prepare an application.