Analytic Tools
Building a Query
Last updated on 07 Nov, 2025
The Analytic Tools enable you to query collision data by following a simple step-by-step workflow. After logging into the application, you will immediately see the query page. This article will describe the steps to build a query.
The first step is to choose a query type by clicking of the six options:

High Collision Intersections
This option is used to generate a list of intersections with high collision concentrations. The results will show intersections with collision counts rather than lists of individual collisions like the other options.
General Query
The general query will allow you to search for collisions from all available collisions in your jurisdiction.
Intersection History
Intersection history enables you to narrow your query to a single specific intersection. Choosing this option will present a subsequent step to select the intersection.
Spatial Query
The spatial query allows you to define a collision search area by drawing the boundary on a map. The map contains a several drawing tools and the option to include a buffer for drawing the boundary. If available for your jurisdiction, you can also search by a City Council District.
Corridor Query
Corridor Query allows you to search for collisions within a specified corridor. The user selects a corridor, then defines the start and end points and whether to include or exclude midblock collisions.
Search By Case IDs
The Search By Case ID is used to search for a specific record or records using a comma separated list.
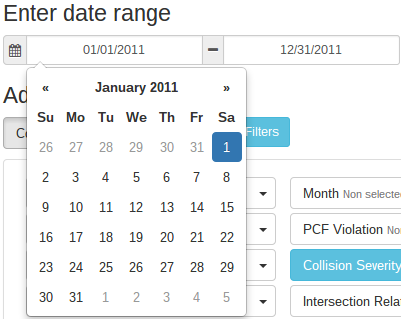
After choosing the query type, you must select a time frame. Enter a date range by clicking on the start and end date range. You can select from the dropdown calendar or manually type the date in using the format shown.

Following selection of a date range, you can specify two optional time ranges. The default value is to search for all crashes that within a 24 hour period. However, you might be interested in specified time range, such as morning and afternoon rush hour related collisions. Input the range by typing on values into time range 1 and 2.

Next, if you have chosen intersection history as your query type, you will see an option to select an intersection. If you click on the first box to select a street, a dropdown menu will appear showing all primary streets available. You can scroll through the list, or if you begin typing the options will be narrowed down. After selecting a primary street, the next box will allow you to choose a secondary street. Only intersecting streets will be shown based on the primary street chosen. Note that if you selected an on/off ramp as the primary street, no secondary street will be available.

If you have chosen Spatial query, then you'll see a map with selection tools. You may see an option to select City Council District if available for your jurisdiction. Otherwise, you will see the drawing tools where you can also set a buffer distance.

Otherwise if you have chosen Corridor query then you will have to define a corridor. See the Corridor query topic for more information.
At this point, all information required for a query has been entered. You can either go straight to the results by clicking on one of the blue buttons or you can optionally add filters beforehand. If you doing a general query or an intersection history query, the results will open in a new window. However, the high collision intersection rankings list will appear directly at the bottom of the query page. Additionally, the General Query has a Preview Results option before generating a results window that gives quick counts and prevents accidental large queries from being made.

The filters available for your jurisdiction are shown by category. Clicking on any of those categories will display a list of dropdown options to specify a filter as shown below. For example, if you select the Party category, you will see a Movement Preceding filter. Clicking on that shows a dropdown of each vehicle movement that can be clicked on to filter by. As you select the filters, a current filter list appears on the right side. This list updates as you add or remove filters. It also allows you to remove a filter directly by clicking on the X to the right of the filter.

Note that the filter options are based on the available data. The collision data for your locale will have numerous different fields for each category. We have selected only a subset of the most commonly used fields to avoid a cluttered interface. If you need a specific filter that is not shown please contact support to have it added. For a more in-depth description of using filters, refer to the Using filters help topic.

